
Our kitchen island is lacking seating. With some stools it'd make a great breakfast area or anytime eating area. We did have one stool but a set of four matching stools would be great. I thought this would be a project that I could take on. I've been able to get a ton of walnut from my dad who had some sitting around in the shed between tractors. I thought walnut would make some beautiful stools and it matches the darker wood of our flooring.
Design
I've acquired a couple woodworking books and one of the joints that really caught my eye was a half lap dovetail joint. I like the look of it and it seems very strong mechanically. I decided to integrate half lap dovetails into the joint from the legs to the crossbars. This gives every stool 8 half lap dovetails (4 crossbars x 2 ends each).
I decided the legs will connect with the seat using stub mortise and tenon. Stub just means the tenon doesn't come all the way through to the other side of the seat. The trick with this joint is that the leg does not hit the plane of the seat perfectly perpendicularly (the legs are not normal to the seat). This means I need to either angle the tenon or angle the mortise. Usually an angled tenon is easier than mortise, so hopefully you can see what that angled tenon looks like in pictures further down.
Late last year, I built a prototype stool to see if my ideas made sense. I blogged on that process here.

Build
All of the black walnut stock I have is 1" thick. For the legs and seats, I wanted at least 1.5" thick so I had to glue many board faces together. Here, I'm gluing all the legs together at once for the first stool.

I cut the legs all to the same length with parallel but angled cuts on both ends. I built a jig for arranging the angled legs so I get perfect alignment and orientation every time. I cut the crossbars to length (a bit long) and then cut the tails out on the table saw with a tenoning jig and the tablesaw blade at an angle. I then arranged the crossbars on the legs and drew the lines for material I have to remove for the half lap dovetail. These all came together pretty quickly.

Next I had to make the angled tenon. I messed up my first try, but I didn't make an irreversible mistake. I again used the tenon jig with the tablesaw to make all the cuts. It went very smoothly after I got it all figured out. After all the angled tenons were cut, it was time to chop the mortises. This took a while, but got quicker as I learned how the wood worked. A great way to remove a lot of material quickly was a Forstner bit. Then I used a couple chisels to finish the mortises up.


For pre-finish work, I rounded the top and underside corners of the seat with a 1/4" round-over bit on my router. I broke all the corners of the legs and crossbars with sandpaper especially where you rest your feet.
I was then able to assemble and glue. When gluing, I clamped the whole thing down to the top of my workbench. This kept the legs aligned and after gluing the stool didn't rock at all! This went decently with help from my wife, but I could've done a better job removing excess glue. The finish really brought where small films of glue remained. For a finish I used two coats of Danish Oil natural color. It really brings the black walnut to life and is fairly hard to mess up.


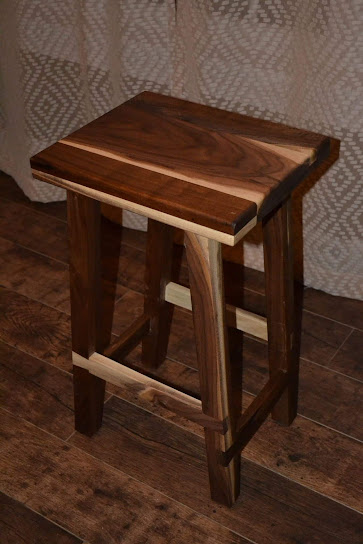
At the time of this writing, I've only built one. I hope to add more progress pictures when working on the others.